Wednesday, March 31, 2021

Garden Apron from Old Jeans


Finished garden apron

I belong to a few international Facebook groups for sewists who make upcycled creations. A few weeks ago, a fellow sewist posted a picture of a garden apron with pockets she made. I immediately thought, "I need something like that."  I am always setting tools down while gardening and then losing them. I still haven't found a pair of pruners I set down in our strawberry patch several months ago.  My spouse went out and purchased a replacement pair, which is not very eco-friendly. 

The first thing I needed was a pattern or model. I looked at a couple kitchen aprons we owned and didn't love their shape. Then I went online. I found some patterns that used flowery quilting fabric. I wanted something a little more durable. Then happened upon this apron pattern from Sew4Home. I liked the idea of durable and the split skirt.  Sew4Home has a more detailed pattern and instructions if you want to make yourself the more traditional way. What I will do is to tell you more about how to make an upcycled version of this apron.  

I started with two pairs of jeans offcast by my neighbors. One was darker blue and had more useable fabric and the other pair was lighter and a little more worn.

The pattern called for starting with a big 20 X 31 inch rectangleI didn't have a piece of denim that large so I had to piece it together. On the darker pair, I cut the pant legs off just below the ripped area.  I used the seam ripper to take apart the flat felled seamsI could have cut the seams but I was in a seam ripper mood. I kept the inside serged seams intact. I also used the seam ripper to detach a couple of the pockets and belt loops.


Seam ripper and jeans


I was left with two pieces of flat fabric that were not square. I pressed the two pieces then pinned them together right sides together and serged them together on the diagonals with what was the bottom of the jeans facing in opposite directions. After serging I unfolded the fabric and pressed the fabric so it laid relatively flat


Cut pant legPieced denim


From there, I cut the 20 X 31 rectangle, then used a printed pattern to cut the armholes.  I was able to cut out the two smaller rectangles for the split skirt from the other pair of jeans without piecing anything together. 

I wanted moderate cutesiness with this apron so I cut flower, carrot and leaf shapes from the denim to form applique. I used a fine zig zag stich to attach them to the pocket or the apron it self. I stitched the applique onto the base in a random order (some before I started sewing on the skirt, some after) because it was the fun part and I was alternately wrestling with my serger and sewing machine so sometimes I would be frustrated and switch to a task that I could do on the other device. 


I deviated from the pattern and did my own thing with the pockets, topstitching two of the existing pockets on and also adding a few beltloops to hang sharper tools, I put a small piece of denim on the back to add some stabilization to the belt loop areas. For the bottom pockets  I used the bottom of the pantleg and and part of the seam on another leg and another piece of fabric. 

In order to sew the bottom rectangles onto the top ones, I used a four thread serged stitch instead of the flat felled seam called for in the pattern.  


To hem the apron, I serged to finish the edges and folded over once and topstiched.  The pattern calls for folding twice and my machines are just not industrial enough for too many layers of denim. For a more fitted item of clothing, you might have to do some calculations on how this will affect the size, but this was an apron so I didn't really care, I wasn't in the mood to piece together the fabric for the ties because my denim wasn't long enough so I went into my stash and found  bias tape that would work.  I sewed that on using a box pattern. 

You can see a picture of me using the garden apron. This project was a family breakthrough because my spouse said he wanted one too, but in a more masculine pattern. 


P.S. After I used the apron I decided I am going to add some belt loops toward the sides of the apron to better accommodate longer tools. 


Sunday, March 28, 2021

Can we behave as if the living world were a gift?


One of the best books I have read recently is Robin Wall Kimmerer's Braiding Sweetgrass. Kimmerer is a biologist by training and a member of the Citizen Potawatomi Nation. In the book, Kimmerer weaves together her academic training with indigenous ways of relating to the world and nature. She talks at length about treating the fruits of the earth as gifts. She writes:

How, in our modern world, can we find our way to understand the earth as a gift again, to make our relations with the world sacred again? I know we cannot all become hunter-gatherers—the living world could not bear our weight—but even in a market economy, can we behave “as if ” the living world were a gift?

In other passages she writes about how gifts of the earth are present without us doing anything if we are open to seeing them. 

Most of my upcycling projects are about making something I can use.  And things appear in my life without my going to the store and finding something that was newly extracted from the earth. Since I am on social media and have been asking for materials, some of my neighbors will now just drop stuff off. Other times, I stumble upon something.  For example, I had denim idea projects swimming in my head. I can never find jeans that fit and my kid won't wear them so I actually don't have offcasts of my own.  However, on one of my daily walks, I happened upon free items on the curb, which included two pairs of used jeans with  usable fabric

A pair of jeans is from the earth and I have come to see these things that I happen upon as gifts, but unfortunately I am not sure that most of my fellow Americans feel the same away. I live in a household in which we all compost and recycle religiously and even have purchased Terracycle boxes. My kid is beginning to think his mother is super strange and has tried to physically lead me away from a dumpster on the curb (I found a bin of sewing materials in that particular dumpster bag).  My spouse's tactful answer about my projects is, "I like that they keep you busy."  Though he does like the Tupperware lid chaos reducers I sewed and put in the kitchen cabinets. 


Dumpster bag with a bin of sewing supplies


I wonder how we shift our thinking about stuff and what we do with "garbage." This blog is designed to give you some ideas on what you can make or do, so that is one things.  But you and I are only two people.  We need to change societal attitudes about stuff and garbage. What a difference treating our things as gifts would make.  

Stay tuned to future blog posts about this subject.

Wednesday, March 24, 2021

Glider Makeover - Part 3

This is post three in series of blog posts about a glider I save from the trash.  Read Part 1 and Part 2

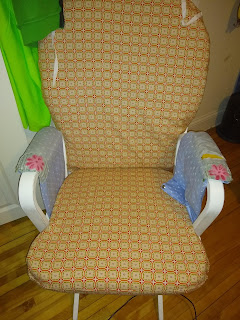
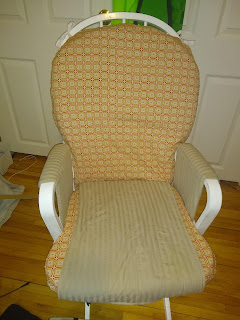
Glider with seat and back covered


This is what the glider looked like after I recovered the seat and back cushions. It was a busy pattern and my son was denying that he chose the fabric I used. I did have some solid fabric in my stash that matched the tan color in the patterned fabric.  The solid fabric was from a thrifted duvet cover.  So I decided to cover the armrests in the solid tan fabric. My son claimed that the fabric was ugly, but I decide to proceed. 

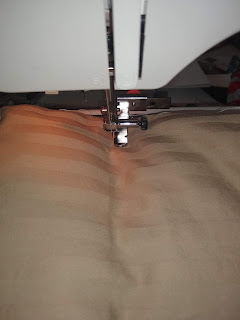
The arm rests snapped off. I used the existing arm rests to draft a pattern and I cut out two for each side (four total).  There were snaps I needed to leave uncovered so the arm rest would snap back into the chair. I so used my machine to stitch up the long side of my arm rest shape right sides together and left both ends open. I turned the tube right side out and inserted the arm rests inside and then stitched the fabric to the existing arm rest on existing folds and seams. I used a zipper foot. 


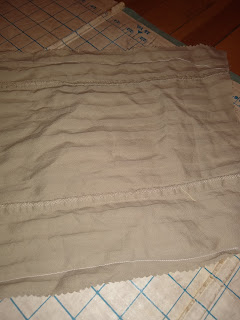
Fabric cut out

Stitching in the ditch


I then folded down the ends and stitched those down. I had to use hand stitching for part of it. While I left the old snaps uncovered in a way that the old fabric was still showing, you can't really tell when it was reattached to the glider. 

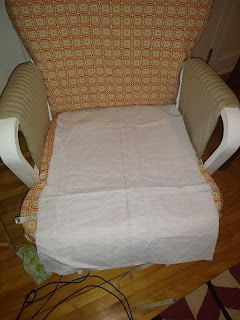
Seat pad cushion


I decided that I was not quite done. The chair was still pretty busy. Plus the thrifted fabric was a little thinner than the fabric I had removed once was. I decided to create a pad that would cover the seat and protect the seat cushion where it had worn most previously. I discussed the addition with my son who admitted it would help the aesthetic of the chair. 

I had intended to make a double-sided pad with tan on the outside and batting on the inside. I was using a scrap piece of velour as the batting. I also was getting close to mentally done with the project and I wanted to construct the piece so that I would sew right sides together with ribbons tucked in and then turn it outside rather than quilting the three pieces, then binding the edges. I used more tissue paper to make a pattern and tested it on the seat cushion. 

However, even after I had constructed many three-layer masks in a similar fashion, I stacked the fabric in the wrong order so when I turned it inside out the blue velour was on the bottom. I said to myself "oh well" and decided not to undo what I had done. I then added several quilting stitches to the tan side of the fabric and added the pad to the chair.

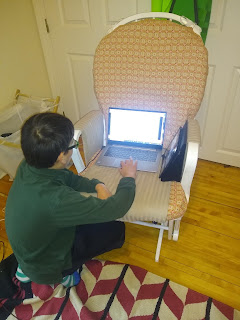
I told my son I wanted to take a picture of him using the glider, but my spouse sat down in it.  So I snapped a picture of him before taking one of the kid. 

And then there is a picture of the glider by itself. I may still tighten up the back cushion a bit, but that can wait until another cold day. 


Spouse on gliderKid using glider as a computer desk


Finished glider


Sunday, March 21, 2021

Glider Makeover - Part 2

This is the second post in a series about salvaging a glider we owned. Read the first one here. 

I knew this project would take a couple weeks so I chunked out the work.  I decided to start on the seat rest cushion cover because that piece needed the most help  

I showed my son how to take the seat cover off the foam using a seam ripper. That was relatively fast


My son ripping out a seamRipped cushion cover


We then created a paper pattern by laying down the old cushion fabric on some tissue paper that had been once used for packing paper and traced around it.  The existing cushion cover was in terrible shape and I didn't know if it would make a good pattern so we added 1/2 inch extra all the way around so that we could have some wiggle room. 


Paper pattern

We used the paper pattern to cut out the first piece of fabric. Then in order to match the design on the fabric, I used the first piece of fabric as a pattern for the second. 


Basted seams

I hand basted the cover, right sides together, with about a 1/2 inch seam allowance.  Keeping the cover inside out, we inserted the cushion  Then we hand basted some more to get the correct fit, including adding a couple gathers on the front. My son was not not happy about this task. 

Basted seams

Then I went to my sewing machine and I sewed the two pieces (still rights sides together), stitching just inside of where I had hand basted,  leaving an opening on the back of the cushion. I removed the hand basted stitches and turned the stitched cover back right side out and inserted the cushion to make sure it fit. 

The I turned it back inside out, trimmed some of the long edges with scissors and finished the edges by serging them. You could simply use a zig zag stitch if you don't have a serger.  Then I turned it back right side out. 


Serged seams


With the cover on the cushion, I turned down the seams at the opening, folding twice and pinning. I took the cover back off and then I topstitched those seams, with two rows. I had several sew on snaps that were part of the jumble stash I acquired.  As you can see they were quite old as that the package originally sold for 10 cents. I hand sewed on five snaps.  I used the ties from the previous cushion cover. I top stitched those on just on either side of the closures so the cushion could be secured to the chair. 


Snaps that cost 10 centsTurned down closure


Cushion with ties


Then I put the seat cushion back on the chair. It looked pretty awful with the other fabric, which was a motivator for my son to work with me on the next part. 

Glider with mismatched cushions


We finished the back cushion in a similar fashion, but we didn't remove the cover fabric because it was stitched to the foam. To obtain our pattern, we traced around the cushion and then added enough extra all the way around to take care of half of the depth of the cushion (in this case about an inch), plus 1/2 inch for the seam allowance and another 1/2 inch to give us some wiggle room.

I used the same method to fit the backrest as we did for the seat cushion, hand basting one time around leaving an opening at the bottom of the cushion, inserting the cushion, hand basting again to get a good fit, then machine stitching to the inside of the hand basting. I removed the hand basting, trimmed some of the excess edges and serged to finish. 

Then I realized I forgotten to add the ties. So  I had to undo a couple inches of the topstiched seam at either edge of the cushion. Then I inserted two pieces of ribbon in two places on the the inside of the cover pinned it in place and then stitched over the ribbon. You can't see too well what I did here because I did not turn it back right side out to attach the ribbon. 


Adding ribbon back on


I hemmed the closure the same way I did the seat cushion and sewed on snaps. 


Glider project - two thirds done

At this point the project was two-thirds done. Stay tuned for the final third of the project


Wednesday, March 17, 2021

Glider makeover - Part 1

A friend gifted us a hand-me down glider when I was pregnant. At that point the gilder was a decade or two old. We used it a lot  It was a good place to nurse, cuddle and read to an infant/toddler.  My son is now 10, but the glider is still in his room. He still uses it, mainly as an iPad stand.

The seat and arm rest covers began to show wear a couple years ago.  As you can see, I visibly mended it, which extended the life by 18 months. A few weeks ago the cushion fabric completely split open. A lot of people would probably have thrown away the glider at that point.  I probably would have done the same a few years ago. But now I salvage things. The wood frame was still in good shape so I decided to recover the cushions.

This is the first post in a series describing how I undertook this endeavor. 

Glider with ripped seat cushion


I had to make some calculations when I started this project. The only part of this chair that  was designed for washing were the arm covers. The backrest cushion cover was actually sewn into the foam. I had removed the seat covering to wash it before I patched it previously, but I had to undo stitches and it frayed in the washing machine because the seams were not finished. I had never washed the back rest, but had simply turned the cleaner side to face out.

I definitely wanted coverings that could be washed. That meant finished seams and closures that could be easily opened. For the back rest, I knew I wouldn't be able to keep the grooves that you can see in this picture. 

The arm pads that did detach for washing snapped into the frame. I don't have a snap tool and the fabric around the existing snaps was in decent shape so I decided to leave them be and work around them. 

We also had to choose fabric to use. Luckily, there were some larger pieces in my 38-lb box.  My son selected one fabric and, although it was thrifted, it did not appear to be pre-shrunk so I washed it. 

My son later claimed it was not the pattern he actually chose once the project was underway. Alas.  

Another calculation involved getting my son off Minecraft long enough to work on this project with me. I knew that was probably going to be the biggest challenge in all of this. 

You can read more step-by-step instructions and whether I succeeded in keeping my kid off Minecraft in blog posts, I will publish later this month. 

Sunday, March 14, 2021

Taking a break from sewing to sow

I took a break from sewing this week to sow - that is winter sowing seeds in my garden. This is the first time I am attempting winter sowing so I will have to write an update on how it goes. Winter sowing is a method in which you start seeds in plastic containers you set outside in, as you guessed, in the winter. The plastic containers serve as greenhouses. This way you don't need grow lights and other fancy equipment. The seeds will sprout when they are ready. It is a perfect way to use materials that you already have. 


Seeds in containers for winter sowing


Before the pandemic, we rarely ordered takeout because of all the waste it created.  We would eat in and bring leftovers home in our own reusable containers we brought for that purpose. However, over the past year, we have wanted to support local businesses and we are simply not going to dine in until we are all vaccinated.  So we have ended up with way too many plastic containers. 

I used a couple containers that entrees from the homemade noodle shop down the street Magic Noodle came in, other take out containers and clam shell packaging that once held salad greens. I poked holes in both the top and the bottom of the containers and filled it with potting soil I had purchased. I planted the containers with cold hardy plants including peas, lettuce and spinach. 

I am going to have to remember to remove the lids on warmer days so the containers don't heat up too much. Last year I had the inspiration of making a mini greenhouse from a plastic bin and I ended up frying a bunch of plants. 

I have taken other upcycling steps in my garden. Last year, I walked down our alley, collected branches and made this trellis. I started the project using hammer and nails, then switched to lashing with string. Then a neighbor stopped by.  She said, "I have some hemp twine you can use." Then she went home and came back with it. That was a good string to use. 

I am hoping to make more trellises this spring and will post a how-to along with my gardening update


Wednesday, March 10, 2021

Adventures in fabric scavenging

I love to wear comfortable knit dresses, but I have trouble finding ones that fit, are flattering and have pockets. Since the pandemic began, I have made myself three dresses that met my requirements. When I picked up the fabric that later became this dress, I would not have imagined it could make clothing that I liked.  

Upcycled knit dress

As you know from my previous post about acquiring fabric to upcycle, I have been using Facebook to find materials. Someone a few miles away from where I live posted that she had free fabric to give away. Of course, I was all over it. 

When I arrived at her house, there were three of four paper bags on her doorstep - the picture had depicted one bag. It seemed like more than I needed, but it was winter with snow on the ground during a pandemic so I took the bags and decided to sort through them at home. The fabric giver told me I could pass along anything I didn't want. 

The bags were a complete jumble of fabric, notions and random craft items. And judging by the prices on some of the items, many of the notions were at least 40 years old. 

There was one absolutely beautiful piece of fabric in the lot and a few that looked like pieces I could work with. But most of the fabric was musty -  like it had been sitting in a garage or basement for years. Some pieces were discolored. I thought I might toss quite a bit of it. I gave away the jingle bells and confetti packages. But the longer that I kept the other assorted materials, the more I realized I could use them after all. 

I washed the musty fabric. And then I made my first knit dress using this pattern. Of course I wanted another and it occurred to me that there were knits in the jumble stash. I took the two pieces of black/white fabric that are pictured here for the dress. The larger piece had tan in it and I had a tan t-shirt with a hole in it sitting around I had to cut off the discolored parts of the striped material, but there was still more than enough to work with.

So even from materials that I first thought were unusable, something new could emerge. 

Sunday, March 7, 2021

Transforming raw material

My spouse likes to compare me to someone who grew up in the Depression. I think he once purposefully put some aluminum foil from a takeout order in the recycling bin before I could get my hands on it to rinse and save for reuse. 

During the Depression and subsequently in World War II, people in the United Stated had to save and reuse everything, even making clothes from flour sacks. This ethic was fading by the time I was born in the 1970s. Though I could often witness it when I went to visit relatives in India. 

However, I am not really like someone who grew up in the Depression. I am not poor, first of all. I can buy more aluminum foil if I choose.  Also, we as humans have become far more adept at extracting natural resources than we were in the 1930s and the 1940s. Many of us are also more disconnected to what it takes to actually produce something.  

I do not want to glorify poverty and I like things like central heating, but there is also great peril in being able to continually buy things. In the 25 years between 1980 and 2005, the extraction of resources on a global scale increased by 50 percent.  We are using the fruits of the earth faster than they can be replenished. 

We need to change our ethic around these resources and repurposing is one way to do that Here is an example of one thing that I took that was not usable and made it into something  that was. I did the reverse of a flour sack dress and took an article of clothing and made it into something to hold food. 

I purchased this blouse new several years ago. I bought it at a department store and was expecting decent quality. Almost immediately the embroidery began to unravel.  If I knew what I know now, I would have added a little fabric glue and continued using the blouse. However, I didn't know how to do that and I let it sit in a bin of clothing for years.

Unusable blouse


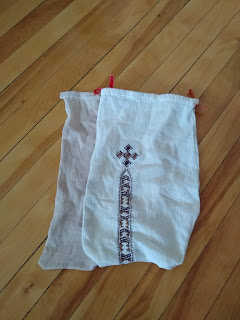
During pandemic decluttering, I pulled it out. By that time, the underarms had become discolored and the elastic had totally worn out. The elastic could have been replaced - the discoloration not so much. I had some reusable produce bags that had started to rip so it seemed logical to turn this light weight fabric into drawstring produce bags. I dyed one bag with black tea as an experiment. 

There are a number of tutorials on making drawstring bags on the internet -- here is one that involves hand sewing - so am not going to provide step-by-step instructions on making a drawstring bag, but it is a simple way to transform an old piece of clothing or fabric. And now I have made something usable again. 


What will you repurpose?  


Wednesday, March 3, 2021

Towel to cake strip upcycle

This is the second of two blog posts about what you can do with a towel that is showing wear. In addition to sewing, I also like to bake.  And cake is one of my favorite things to bake. 

If you want your cake to turn out flat you need cake strips. You wet the strips and wrap it around the pan. Then you put the cake in the oven. The evaporation of the water will cool the outside of the pan so that the center of the cake cooks at the same rate as the outside, preventing the cake from doming. 

This is a cake strip that I bought ready-made several years ago. As you can tell it is on its last legs. The heat resistant coating has burned off in places.  These strips were purchased to replace a set of cake strips I had made from an old towel as suggested by a cake decorating instructor.  


Cake strip


I used the purchased cake strips for many years, but honestly my old ones made from a towel, worked better. They soaked up more water, the cakes turned out flatter and the strips fit my pans better.

So when one of my hand towels was showing wear, I decided I should make cake strips with it. First I trimmed the edges of the towel. Then, I cut the towel into thirds length wise. The pieces were approximately 4.5 inches high and  24 inches long. I was aiming to make two cake strips. The length of the towel was not quite long enough to use as a cake strip so I took one of the thirds and cut it in half so it was about 4.5 inches high and 24 inches long. 

cutting towelcutting towel into strips


I pieced together the 4.5 x 24 inch piece with the 4.5 X 12 inch piece. I used an elastic stitch so that I would not have a bulky seam. I went back and forth a few times. I used 100% cotton thread because I did not want melting thread in the oven.


spool of cotton thread


Then I folded the towel in half and sewed a zig zag stich near the raw edge.  I also added a zig zag up the middle to help reinforce the towel where it was worn. I do own a serger, but I did not feel like creating three or four cones of all cotton thread, so I used the sewing machine. 


sewing towel


Here is the finished product around the pan, attached together with all metal pins. I don't generally bake cakes for myself and a cake this size would need to be eaten by several people so there is no batter in the pan. I can't wait until I can bake for people again.


Towel cake strip