Sunday, March 14, 2021

Taking a break from sewing to sow

I took a break from sewing this week to sow - that is winter sowing seeds in my garden. This is the first time I am attempting winter sowing so I will have to write an update on how it goes. Winter sowing is a method in which you start seeds in plastic containers you set outside in, as you guessed, in the winter. The plastic containers serve as greenhouses. This way you don't need grow lights and other fancy equipment. The seeds will sprout when they are ready. It is a perfect way to use materials that you already have. 


Seeds in containers for winter sowing


Before the pandemic, we rarely ordered takeout because of all the waste it created.  We would eat in and bring leftovers home in our own reusable containers we brought for that purpose. However, over the past year, we have wanted to support local businesses and we are simply not going to dine in until we are all vaccinated.  So we have ended up with way too many plastic containers. 

I used a couple containers that entrees from the homemade noodle shop down the street Magic Noodle came in, other take out containers and clam shell packaging that once held salad greens. I poked holes in both the top and the bottom of the containers and filled it with potting soil I had purchased. I planted the containers with cold hardy plants including peas, lettuce and spinach. 

I am going to have to remember to remove the lids on warmer days so the containers don't heat up too much. Last year I had the inspiration of making a mini greenhouse from a plastic bin and I ended up frying a bunch of plants. 

I have taken other upcycling steps in my garden. Last year, I walked down our alley, collected branches and made this trellis. I started the project using hammer and nails, then switched to lashing with string. Then a neighbor stopped by.  She said, "I have some hemp twine you can use." Then she went home and came back with it. That was a good string to use. 

I am hoping to make more trellises this spring and will post a how-to along with my gardening update


Wednesday, March 10, 2021

Adventures in fabric scavenging

I love to wear comfortable knit dresses, but I have trouble finding ones that fit, are flattering and have pockets. Since the pandemic began, I have made myself three dresses that met my requirements. When I picked up the fabric that later became this dress, I would not have imagined it could make clothing that I liked.  

Upcycled knit dress

As you know from my previous post about acquiring fabric to upcycle, I have been using Facebook to find materials. Someone a few miles away from where I live posted that she had free fabric to give away. Of course, I was all over it. 

When I arrived at her house, there were three of four paper bags on her doorstep - the picture had depicted one bag. It seemed like more than I needed, but it was winter with snow on the ground during a pandemic so I took the bags and decided to sort through them at home. The fabric giver told me I could pass along anything I didn't want. 

The bags were a complete jumble of fabric, notions and random craft items. And judging by the prices on some of the items, many of the notions were at least 40 years old. 

There was one absolutely beautiful piece of fabric in the lot and a few that looked like pieces I could work with. But most of the fabric was musty -  like it had been sitting in a garage or basement for years. Some pieces were discolored. I thought I might toss quite a bit of it. I gave away the jingle bells and confetti packages. But the longer that I kept the other assorted materials, the more I realized I could use them after all. 

I washed the musty fabric. And then I made my first knit dress using this pattern. Of course I wanted another and it occurred to me that there were knits in the jumble stash. I took the two pieces of black/white fabric that are pictured here for the dress. The larger piece had tan in it and I had a tan t-shirt with a hole in it sitting around I had to cut off the discolored parts of the striped material, but there was still more than enough to work with.

So even from materials that I first thought were unusable, something new could emerge. 

Sunday, March 7, 2021

Transforming raw material

My spouse likes to compare me to someone who grew up in the Depression. I think he once purposefully put some aluminum foil from a takeout order in the recycling bin before I could get my hands on it to rinse and save for reuse. 

During the Depression and subsequently in World War II, people in the United Stated had to save and reuse everything, even making clothes from flour sacks. This ethic was fading by the time I was born in the 1970s. Though I could often witness it when I went to visit relatives in India. 

However, I am not really like someone who grew up in the Depression. I am not poor, first of all. I can buy more aluminum foil if I choose.  Also, we as humans have become far more adept at extracting natural resources than we were in the 1930s and the 1940s. Many of us are also more disconnected to what it takes to actually produce something.  

I do not want to glorify poverty and I like things like central heating, but there is also great peril in being able to continually buy things. In the 25 years between 1980 and 2005, the extraction of resources on a global scale increased by 50 percent.  We are using the fruits of the earth faster than they can be replenished. 

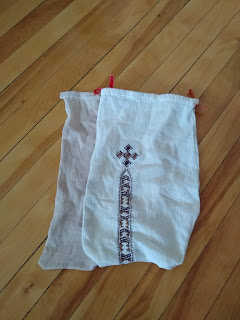
We need to change our ethic around these resources and repurposing is one way to do that Here is an example of one thing that I took that was not usable and made it into something  that was. I did the reverse of a flour sack dress and took an article of clothing and made it into something to hold food. 

I purchased this blouse new several years ago. I bought it at a department store and was expecting decent quality. Almost immediately the embroidery began to unravel.  If I knew what I know now, I would have added a little fabric glue and continued using the blouse. However, I didn't know how to do that and I let it sit in a bin of clothing for years.

Unusable blouse


During pandemic decluttering, I pulled it out. By that time, the underarms had become discolored and the elastic had totally worn out. The elastic could have been replaced - the discoloration not so much. I had some reusable produce bags that had started to rip so it seemed logical to turn this light weight fabric into drawstring produce bags. I dyed one bag with black tea as an experiment. 

There are a number of tutorials on making drawstring bags on the internet -- here is one that involves hand sewing - so am not going to provide step-by-step instructions on making a drawstring bag, but it is a simple way to transform an old piece of clothing or fabric. And now I have made something usable again. 


What will you repurpose?  


Wednesday, March 3, 2021

Towel to cake strip upcycle

This is the second of two blog posts about what you can do with a towel that is showing wear. In addition to sewing, I also like to bake.  And cake is one of my favorite things to bake. 

If you want your cake to turn out flat you need cake strips. You wet the strips and wrap it around the pan. Then you put the cake in the oven. The evaporation of the water will cool the outside of the pan so that the center of the cake cooks at the same rate as the outside, preventing the cake from doming. 

This is a cake strip that I bought ready-made several years ago. As you can tell it is on its last legs. The heat resistant coating has burned off in places.  These strips were purchased to replace a set of cake strips I had made from an old towel as suggested by a cake decorating instructor.  


Cake strip


I used the purchased cake strips for many years, but honestly my old ones made from a towel, worked better. They soaked up more water, the cakes turned out flatter and the strips fit my pans better.

So when one of my hand towels was showing wear, I decided I should make cake strips with it. First I trimmed the edges of the towel. Then, I cut the towel into thirds length wise. The pieces were approximately 4.5 inches high and  24 inches long. I was aiming to make two cake strips. The length of the towel was not quite long enough to use as a cake strip so I took one of the thirds and cut it in half so it was about 4.5 inches high and 24 inches long. 

cutting towelcutting towel into strips


I pieced together the 4.5 x 24 inch piece with the 4.5 X 12 inch piece. I used an elastic stitch so that I would not have a bulky seam. I went back and forth a few times. I used 100% cotton thread because I did not want melting thread in the oven.


spool of cotton thread


Then I folded the towel in half and sewed a zig zag stich near the raw edge.  I also added a zig zag up the middle to help reinforce the towel where it was worn. I do own a serger, but I did not feel like creating three or four cones of all cotton thread, so I used the sewing machine. 


sewing towel


Here is the finished product around the pan, attached together with all metal pins. I don't generally bake cakes for myself and a cake this size would need to be eaten by several people so there is no batter in the pan. I can't wait until I can bake for people again.


Towel cake strip


Sunday, February 28, 2021

Mending a towel

Sewing is an imminently practical art form. It allows you to fix what you have and make what you want to your specifications. This is the first of two posts about what you can do with a towel that is starting to show wear. These projects are both simple, perfect if you are just starting to sew with a machine. And most of us will have material to work with. 

Towels often wear out first around the edges. Often when this happens, the rest of the towel is still in pretty good condition. You can fix the towel fairly quickly and easily.

This is the beach towel I mended today. You can sees strings hanging off and the frayed edges.


I started this project by using a seam ripper to take out the edging that was still intact. I then trimmed off the fraying part with a rotary cutter. You could use scissors as well. 


Then I took the towel to my sewing machine and sewed a zig zag stitch up both sides of the towel, backstitching at the ends so the stitching does not unravel.  This towel didn't have any holes in them, but on other towels I just worked a zig zag stich back and forth over the hole to patch it up. 

I have done this with several towels in the last couple years. There will be some fraying at the edges until it reaches the zig zag stitch, but the stitch will prevent it from fraying more and will allow you to use the towel for a few more years. 


Wednesday, February 24, 2021

Sourcing fabric for upcycling - or how I ended up with a 38-pound box of it


In order to upcycle fabric, you have to have fabric to work with. What I have discovered over the last year is that there is more than enough fabric in the world to upcycle. 

I started my upcycling quest with fabric I had laying around - old clothes, socks with holes and linens from my parents house. Then I made my first ask on the neighborhood sell/barter/trade Facebook page.  At that point, I was looking for some fabric to make colorful patches to use in mending.  wo neighbors obliged with a couple bags of scraps.  

I had wanted to make a braided rug for decades and sometime last winter I  decided to host a fundraiser for Saint Paul Youth Services.  The plan was to have a house party in May 2020 where I "sold" things that I had to made to encourage zero waste practices and to support this racial justice organization.  In order to purchase supplies for both projects,  I went to a Goodwill Outlet to buy t-shirts to cut into strips for the rug and fabric to make bags for zero waste kits to take to the coffee shop or restaurant.  

I made several kits with thrifted silverware and a mason jar mag. Of course I never hosted that fundraiser and you can't bring your own mug most places nowadays so those kits are sitting there until we are all vaccinated. 

Then I started looking on Facebook Marketplace for fabric that people were selling, I bought a lot of upholstery fabric pieces. Now my neighbors are offering me fabric without my asking. I have taken some like some like some old jeans and have had to turn down some offers.

I received the mother lode of all fabric lots a few weeks ago. Many of the Goodwill organizations in the United States offer items through online auctions.  I bid on a few fabric lots, but I was always outbid. then of course I bid something like $35 on a 38-pound lot of patterned fabric and I was the high bidder.  A few weeks later the box arrived. 

The above my picture is my guest room right now. It is going to take me awhile to use all that fabric!   


Sunday, February 21, 2021

Upcycling the upcycling


Working on sewing projects inevitably results in fabric scraps. Upcycling often results in more scraps than virgin fabric because pre-made clothes have features like seams or screen printing that aren't easy to use in other projects. That means I need to upcycle my upcycling!

In the old days people used to save fabric scraps to stuff pillows. However, I have gotten used to modern pillows with fiberfill and don't particularly like to lay on lumps. Using finely shredded fabric would solve that problem, but you can't shred fabric in a home paper cutter and they don't make home fabric shredders. The cheapest industrial one I found online was $5,000.  There are textile shredding services, but they tend to serve customers bigger than just me. 

I live in a cold climate so I have been using these scraps to stuff "draft dodgers" that go at the bottom of exterior doors to stop cold air from coming in.  I took the idea from a member who posted about uses for fabric scraps on one of the Facebook pages associated with Zero Waste Saint Paul.

Making a draft dodger is an easy sewing exercise. In it's simplest form, you cut a rectangle of fabric about 10 inches high and the length of your door and frame (generally 35 to 45 inches) long. You fold the rectangle in half, right sides together.  Then you stitch a seam on the long edge to make a tube. I leave both the short seams unsewn. You then turn it inside out and stuff. 

The scraps need to be small enough to not get into a tangled mess. I have found it easier to stuff from both ends since the tubes tend to be pretty long. I use a rubber band on the end I am not stuffing so the material doesn't fall out. Then I sew up the ends. While I use a sewing machine, it would be easy enough to hand sew one. 


This winter I made at least a dozen draft dodgers for a donation to a wonderful organization I serve on the board of, Saint Paul Youth Services.  

I made my draft dodgers a little fancier than what I described above because I was using them to teach myself new sewing skills. So mine featured applique, piecework, pintucks and ruffles.

Here are some examples. 


Monday, February 15, 2021

Why upcycling is my art form


I have always had a need to physically create things. Over the years I have cycled through different arts and crafts. I landed on cooking as one of my art forms - it is useful and doesn't lend itself to having a pile of unfinished projects (a weakness of mine). More recently I have added sewing to my repertoire. 

A more typical way of approaching sewing is to first decide what you are going to make, then second to purchase a pattern or an online tutorial, and last purchase the fabric and other supplies you need. While sometimes I go that route, I often take a different approach. I wait until materials (often used or new materials people don't want ) come into my life and then I decide what I am going to make. 

I have chosen to do this for many reasons and one of them is that we are extracting resources at a rate that is simply not sustainable.  We use items for short periods of time and then we are done with them. 

This video The Story of Stuff addresses our linear production model and the model's true costs. The model has resulted in environmental degradation, unsafe and unfair working conditions and oodles of stuff we have to dispose of in some way and that way is always problematic.  

That is why I upcycle. 


Saturday, February 13, 2021

Fixing my socks


During the pandemic I came to face my large pile of mismatched, random and holey socks. 
I decided to refrain from buying new socks for a while and use what I have. I haven't been going anywhere so I figured it was fine to wear mismatched and visibly mended socks.  And when I have to dress professionally again, I can continue to wear most of my mended socks because most of them are black and the repair is on the bottom of the sock.

Hand darning is a technique used to fill holes in clothes or linens. Basically you are weaving more cloth where it has ripped or worn down. You only need a few things to hand darn -  needle, thread (I use embroidery floss. You can also buy wool thread made specifically for darning) and scissors. It is also helpful to have an object under the hole like my Easter darning eggWhen I darned my kid's pants, I used a flat Lego so I wouldn't catch the fabric on the other side! Beeswax can also help stiffen thread to make it easier to thread the needle and make the thread less likely to tangle. 

Most of my embroidery floss is composed of six strands. For cotton sock darning, I usually split the floss and use three strands. The first step in darning is to stich around the hole to reinforce the edges. If you are darning socks, you will not want to put a knot in the thread, but rather tuck the loose end into other threads. It is not comfortable to step on knots. The next step is to create long stiches with a very short in a perpendicular stich to keep the lines parallel. These stitches become the warp threads. 


Once these threads are in place, you make a small stitch to the place you can begin start weaving over and under making weft threads. When you finish one end, you put in a small perpendicular stitch and go back in the opposite direction.  You can find more details on how to darn on the Collette blog

Finish off the thread ends by going weaving the end into the work you have done. And then continue to wear your socks!


Tuesday, February 2, 2021

Darning and my darning egg


When I started my quest to save fabric I started with darning. And it's a good place for you to start if you are looking to mend clothing and linens rather than throwing them away.  In my view, fixing things is a forgotten skill in our age. 

You can darn by hand or darn by machine. Darning by hand requires very little equipment and minimal skills. You need embroidery floss, an embroidery needle, scissors and a darning egg, which will help you keep the shape of the item and keep you from catching the other side of the fabric if you are mending something tubular like a sock or the knee of kid pants. 

Because I try to use what is around, my darning egg is not one specifically designed for sewing.  My darning egg is a large green plastic Easter egg that I picked up at a junk swap at my workplace. 

You can make your darning more or less noticeable depending on whether you want visible mending or invisible mending. 

Here is one example of a sock I darned by hand using a contrasting embroidery floss.  


Here is an example of towel I mended using a sewing machine. This is less noticeable and happily I extended the life of this towel by 18 months and counting. 


I will share more information in an upcoming post on how to utilize these techniques, but I want you to first know that we can all fix things rather than throwing them away. 

Low-waste celebration

I turned 52 a few weeks ago and I threw myself a low-waste birthday picnic at a local park. We have been hosting low-waste gatherings at hom...