Tuesday, June 18, 2024

Ridwell - a great service to share

Ridwell box on porch


Our family purchases minimally packaged items, composts food waste and recycles the glass, plastic and paper accepted by city recycling.  And of course, I upcycle. Despite these efforts, we are left with difficult-to-recycle items such as batteries, multi-layer plastic and electronic devices.

Manufacturers ultimately need to become responsible for the disposal of what they create. However, we are a long way from that becoming a reality and it is up to the consumer (me) to make these choices. About a year ago, I became aware of a service called Ridwell when I saw neighbors' boxes out and conversations appeared on the local zero-waste Facebook pages.  Four months ago, I signed up for Ridwell.

Ridwell offers specialty recycling in metropolitan areas such as the Twin Cities, Seattle and San Francisco. There are different options for pricing. The highest tier in my area costs $24 a month (pick up every other week) and includes multilayer plastic, styrofoam, light bulbs and batteries. Users can also select one featured item for each pickup. Metal bottle tops, cords and cables are regular options. Ridwell also offers special categories periodically. 

One of the things I realized in the first weeks of using Ridwell is that there are free local drop-off options for many of the items Ridwell accepts. Prior to signing up for Ridwell, we took plastic bags to Target, batteries to Ramsey County Hazardous Waste, e-waste to Repowered and clothing to Goodwill.  We had also been purchasing Terracycle boxes for multi-layer plastic.  For us, having those items picked up regularly has been really nice. We no longer arrive at Target and say "Darn, I forgot those bags."  For those who are more cost-conscious, the monthly fee may not warrant using Ridwell. 

Ridwell is not single sort and is best for the motivated.  Ridwell provides labeled reusable bags to place items in. My family has difficulty distinguishing between plastic film and multi-layer plastic. I have carefully read the directions. so I have less of an issue. My teenager complains about this. I retort, "Blame the manufacturers for this problem, not Ridwell."

Multilayer and plastic film bags

Another recommendation I have about Ridwell is to share. We signed up for the unlimited plan because it accepts the largest variety of items. But it is hard for only our family to fill up the bin. Two neighbors regularly drop off multi-layer plastic and styrofoam. I will also put out a call on Facebook if we have room in our featured item bags.

I also appreciate the text message reminders about pickups and their monthly dashboard. I haven't forgotten to put out my bin.

A family member who also uses Ridwell has complained that if Ridwell cancels a pickup, they still charge you, but we haven't yet experienced this.  

My verdict is Ridwell is a helpful service we will continue to use, but you can strive to be zero waste without.  

Tuesday, June 4, 2024

The rug is finally done


After more than two years, the locker hook rug project is complete! You can read more about the technique in a previous blog post.  After  locker hooking for many more hours, I finally reached the center.

I tore off the duct tape I had placed to keep the canvas edges from scratching me, folded over the canvas and whip stitched the edges.


I finished it just in time to place on my landing after a painting and carpet replacement project. I choose the turquoise accent paint color to match the rug.

This project used a lot of fabric. I lost count of how many old shirts, pants, sheets and socks went into the rug. It included old clothes from my family and thrifted items. I placed a rug pad that I found in my local Buy Nothing group under the rug to keep it from slipping.

Someday, if I decide to make another locker hook rug, I will use a more flexible canvas. I read this suggestion before I started this project and failed to heed the advice because I would have had to purchase the canvas online rather than locally. It would have been easier to pull the loops through a less stiff canvas.

As the project went in, I got better about assessing the thickness of the fabric and varying the width I cut strips. In the beginning, some strips were too thick, difficult to pull through and made my arm muscles sore. Rugs are bulky and as the project progressed I had to come up with ways to keep working on it by propping it up on pillows on the couch so I could get underneath it.

Overall, I am pleased with how it turned out and looks in my landing and relieved I have crossed this project of my list.


Sunday, March 24, 2024

Learning is struggle or mending a wool sweater

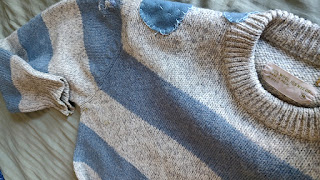
Mended blue and grey wool sweater

I see two types of sewing tutorials online. One comes from highly skilled people They make everything seem easy, but I have enough experience to know it would take me years to achieve their level of proficiency.  The other comes from people who actually do crappy work. They also make it look easy, but I have enough experience to know they are not worth emulating. By and large, no one tells you that learning these skills can be difficult. I am here to do just that. 

Last winter my spouse showed me a favorite wool sweater that had developed several holes. He wasn't sure if they had been caused by moths or wear and time. I tossed the sweater in my bin of items for mending/upcycling and it sat there for a year. 

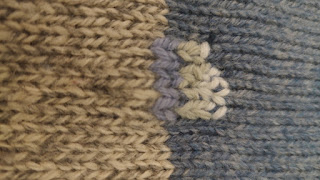
It caught my eye when I was going through the bin intending to reduce the volume of fabric inside. The sweater was taking up a lot of room.  My spouse prefers mending not to be startlingly visible and it seemed like a good opportunity to try Swiss darning for the first time. Swiss darning is a method that duplicates the stitches in the sweater. If you use similar colors it can be relatively invisible.

Using the technique was harder than I anticipated. I struggled. I first attempted to follow the tutorial in the book Modern Mending.  I couldn't quite get it to work. I had difficulty with the geometry of the stitching and the fact that the yarn in the sweater had felted and I couldn't clearly see the stitches I needed to duplicate. Then, I went to this Youtube Video on Swiss darning and attempted their way of Swiss darning. I also checked out other online resources. Alas, none improved my technique.

Not great Swiss darning on sweater

After I had toiled away for several hours, my spouse noticed I was working on his sweater and,  said, "I didn't realize that I gave you that sweater to mend." I did manage to close a few holes, but in no instance did my mending stitches actually follow the sweater stitches in the way it was supposed to. I would probably have been better off using a woven darn, which I am more proficient at.

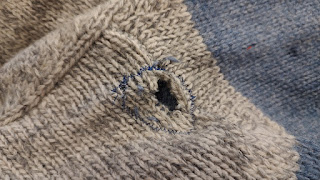
I couldn't use Swiss darning on some of the larger holes near the top of the sweater due to their shape and location and decided to patch them. Even though I know how to patch, this took me a few attempts. To complete these, I used my sewing machine to sew around the hole to keep it from unraveling further. I then used a zig-zag stitch to machine sew on patches cut from fleece scraps The patches puckered and looked really stupid so I undid the machine stitching and then hand-stitched the patches using a blanket stitch. 

Zig zag stitching to keep hole unraveling

After all this work, my spouse declared he felt he had to continue wearing the sweater since I had put so much time into fixing it so there was one small victory in all of this. 

I will try Swiss darning again in the future and hopefully it will go better next time.  

Sweater patching


Sunday, February 18, 2024

Upcycling to reduce an annoying night time glow

Cover for air filter's glowing controls

Some people sew and craft for artistic reasons. I have a drive to make stuff, but I want my creations to solve problems in my life. One of my recent annoyances was the glow from controls on a HEPA air purifier we purchased about a year ago. It put out enough light to be bothersome at night. 

At first, my spouse and I tried to address the problem by covering the controls with a sock. Then someone would decide to wear the sock or it would fall off and we would be back where we started. After enough of this, I decided to sew my way out of this problem. 

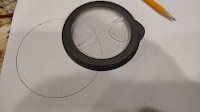
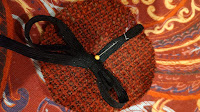
I found an upholstery sample from my stash that I did not have another use for.  I measured the diameter of the glowing controls on the filter.  I used a lid to create a circle pattern that was about an inch longer than the circle on the filter.  I then cut two circles from the upholstery fabric and pinned a long ribbon from my stash onto the right side of one of the circles. (I admit I originally pinned it to the incorrect side and had to redo it, but the instructions here are correct). I then stitched the circles right sides together using a 1/2 inch seam allowance and leaving about an inch opening.

Tracing a circlePinning on ribbon

I then notched the circle, turned it inside out and hand stitched the opening using a whip stitch. I then top stitched around the perimeter of the circle. 


I mentally cycled through various options to secure the ribbon to the filter.  At one point I was leaning toward using some sort of command hook. But after letting it percolate a bit, I figured out the easiest thing was to just tie the ribbon around the cord where it inserted into the machine. I applied fray check on the end of the ribbon to keep it from unraveling. 

This simple and quick project took me an hour and solved the problem. The double-layer upholstery fabric is heavy enough that it stays in place even with the air flow of the filter and does not let the light through. The fact that it is secured to the machine means that we won't lose it. My spouse was impressed with my genius, which was an added bonus. 

Ribbon tied to cord


Sunday, February 11, 2024

Quilted table cloth that stays on table


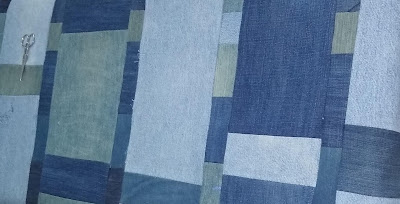
Denim table top

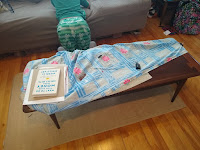
One of the more substantial projects I have completed in the past few years was a quilted tablecloth for our coffee table. Way back before we had a child, we left the table bare. But alas the child came along and quickly scratched and dented the table forcing us to cover it. Of course, we didn't have a coffee-table-sized cloth so we folded a sheet to fit the table and put binder clips around the edges in an attempt to keep it on the table. As you can see, that didn't work so well.  

Kid and messy coffee table and cloth

I had wanted for some time to make a quilted item with denim and had already collected old jeans from people in my local Buy Nothing group

Planning the project 

One of the main reasons to sew your own is that you can customize for your exact needs. I wanted a tablecloth that fit our table. The tablecloth needed to be thick enough to take abuse from the kid, but thin enough to balance a cup of coffee on. I also wanted the tablecloth to stay on the table, which I knew would be a challenge with my kid. 

Once I determined what I needed the tablecloth to do, I determined the size and shape of the finished project.  The table top measured 49 1/2 inches by 19 1/2 inches. I initially had planned slightly smaller, but the finished tablecloth ended up being 59 1/2  by 30 1/2 inches. 

I wanted shaping in the corners so I considered whether I would sew corner seams or add the shaping another way. I decided to sew a flat rectangle that I would gather slightly at the corner with hand sewing. 

The next step was to decide on the materials. I knew the top layer would be denim. I selected a piece of relatively unattractive upholstery fabric I had acquired as the batting or middle layer. I decided to use a duvet cover that I had purchased for $5 at a thrift shop for the bottom layer and binding. 

Piecing the denim 

Pile of cut denim piecesI  cut the seams and worn and torn areas from the many jeans I had collected. I decided that the length of my quilt blocks would simply be the width of the final quilt.  


I created both wider and narrower blocks.  For the width of the larger blocks, I laid pieces of similar size together and made blocks that varied from 6 and 8 inches, plus a 1/4 inch seam allowance on each size. I also created narrow blocks that were 2 inches plus a 1/4 inch seam allowance on each side, totaling 2 1/2 inches. 

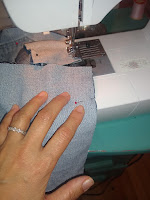
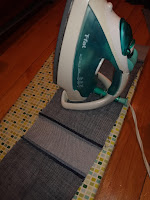
For the wider blocks, I cut the jeans to the width and then laid the pinned pieces right sides together and, using a denim needle, stitched using a 1/4-inch seam allowance. I pressed seams open as I went. The denim was easy to work with and while it took several days, the quilt top came together more quickly than I had anticipated. 


Stitched denim piecesFeeding denim through sewing machinePressing denim pieces


Once I had several blocks, I started stitching them together  (right sides together then pressing open) with a 1/4 seam allowance). Occasionally I laid the quilt top on the table to determine if my initial size calculations were correct. In doing this, I decided to add both length and width to the quilt. 

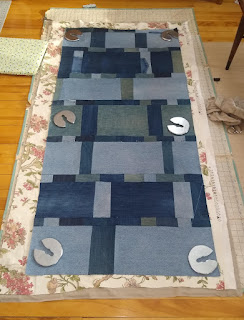
Once I finished the quilt top, I created my sandwich with the quilt top on top, the upholstery fabric in the middle and the duvet cover on the bottom. I cut the two bottom layers bigger than the quilt top because I knew that things could shift when I started stitching the layers together. I used plates from adjustable hand weights to ensure that everything was straight and taught. I pinned the layers together. 


Quilt top and layersI used a quilting foot to secure the layers. I started in the center and "stitched in the ditch" between the quilt blocks. I also stitched roughly in the middle of the wider blocks as well.  I also added some perpendicular seams as well.  The quilting was more arduous than I had expected. The three layers together were fairly bulky and took effort to navigate through my non-professional home machine. I had to fold and secure the edges with binder clips so  I could fit it through At some point I got a little sick of this part of the project and went onto one of my Facebook upcycling pages and asked if I could stop with the quilting stitches.  The replies I received said because I was using fabric in my middle layer instead of quilt batting, I could get away with less stitching than if I had been using batting, I was ok with that answer. 

Once the pieces were quilted together, I trimmed the edges of the bottom two layers.  


Bias strips
 A lot of fabric remained from the duvet cover, so I used that for the binding. I cut along the diagonal or bias in widths of 2 inches.  I folded and pressed it into 1-inch bias tape. I pinned one side to the quilt stiched it, folded it over and secured the other side.  

The coffee table had spindles in the middle so I knew I could secure the tablecloth to those. I stitched four leftover belt loops on the underside of the cloth to match the spindles' location. I threaded ribbon through it so that I could tie the cloth onto the table. 

This is a feature that I am really proud of and something you can't find in a store-bought item. After two years of use, I am pleased to say that although the tablecloth is not always straight, it stays on the table. 


Sunday, January 21, 2024

Taming more chaos while upcycling

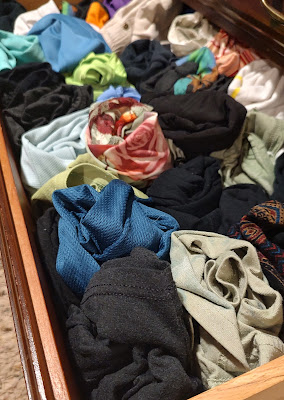
Organized clothing drawer


The blog post I wrote earlier this month on sew-your-own choas reducers is now the most popular post I have written. From that, I surmise I am not the only person who wants to tame the chaos in their house. I have more substantial projects that I would like to share, but I will wait on those so that I can share some more tips on reducing chaos with upcycled materials. 

Just before the turn of the new year, I realized that the downstairs drawers that held my sewing materials and the upstairs drawers that held my clothing were complete disasters. I have found that store-bought organizers never work for me in part because they are never the right size. So I organized them using upcycled materials. 

Vertical storage and old socks

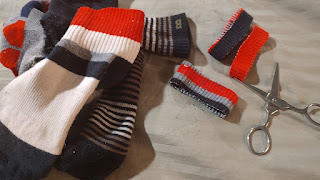
Like many people, I read Marie Kando's The Life-Changing Magic of Tidying Up. While everything in the book sounded great, the only thing I actually implemented was storing clothes vertically.  Doing this allowed me to see everything, but the drawer would revert to chaos when I unfolded one of my many black pieces of clothing to see what it was or when the drawer was less full causing the vertically folded clothes to fall over. A few weeks ago, my son cleaned out his sock drawer and left several holey socks on his floor. He was adamant that I not mend them and they sat around for a few weeks because I could not think of a use for them. Finally, I had a burst of inspiration and decided I would cut the socks into rings and use them to hold my clothes together. 

Socks, scissors and sock rings

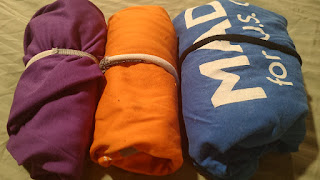
I cut several socks, took each article of clothing out of my drawers, rolled them up and bound them with a sock ring. Then I put the clothing back in the drawer upright. The sock rings didn't constrict the clothing as much as a rubber band and keep the clothes  from becoming unfolded. Now, as pictured at the top,  I can see all the clothing in my drawers and they remain much neater. 

Shirts rolled up and bound by sock rings


Sewing stuff, cardboard and berry containers

My sewing drawers are still a work in process as of today, but I have made several improvements to how I store ribbon, trim and scraps. Before the organizing project, the drawer was full of ziploc bags of ribbon, thread spools that didn't fit into the thread section of my sewing box and scrapsof various sizes. the times were getting all tangled up. 


I put the thread into take-out containers, preventing them from getting tangled up in other items. I folded several of my scraps vertically and placed them in berry containers. I spent the most time on ribbons and trim. I used a shoebox and cut cardboard to fit inside. I wrapped the ribbon and other trims on the cardboard and cut small notches in them so I could keep the ribbons from unraveling. I still have a lot of work to do on the sewing items, but one project at a time.


Monday, January 15, 2024

Sew your own chaos reducers

I find that store-bought organization containers never fit the space I have and just collect junk.  I am, however, a big fan of custom-made items. Over the past few years, I have made several items  I call chaos reducers. They are fabric pockets or baskets in the exact size I need them. I have made chaos reducers for television remotes, jar lids, pencils and plastic container lids.  

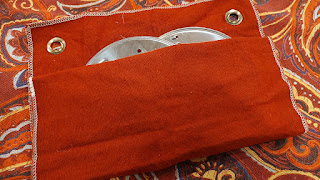
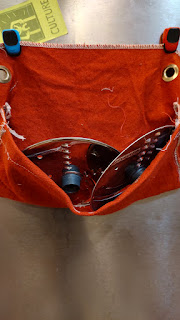
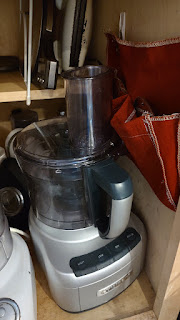
About a week ago I was looking in the cabinet that houses my blender, food processor and other items and I saw, well, chaos.  I have too much fabric and that is also creating chaos. So, I decided to feed two birds with one scone (because who actually wants to kill birds) so I whipped up a quick project to hang the grating and food processor slicing discs. 

I used an upholstery sample approximately 11.5 inches wide and 16.5 inches long with grommets pre-installed. The edges were already serged. For some reason, I really wanted the serged edges to be visible. Plus I didn't have enough width for a gusset construction, so I used construction techniques that might cause someone more expert to look askance. 

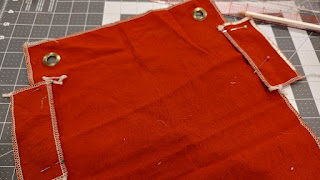
I started the project by laying down the two blades and folding the fabric to roughly fit and marking the fabric.  The pockets needed depth but the fabric was not wide enough so I  cut a strip 2 inches wide from the bottom.  I then cut the strip in half so had two about 2 inches wide and 5.25 inches long. 


Folding fabric to fit discs


Fabric and scissors


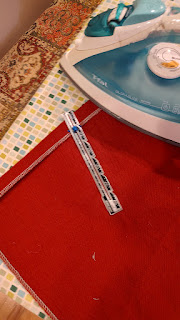
I then serged the raw edges to keep the serge theme going. I folded over the top of the front part of the pocket  (or the bottom of the rectangle) about an inch and hemmed it. I then pinned on the stips flush to where the top of the pocket would be and I stitched about a quarter inch in. 


Pressing hemPinning on sides


Then I folded the bottom of the rectangle up and I stitched on the other side of the stip from the inside. I could not stitch all the way down without catching parts of the pocket I didn't want to catch.  Then I hung it on the fridge to test it.  It gaped like crazy!


Chaos reducer is gaping


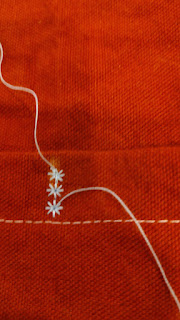
I thought through various options to reduce the gaping like installing a button and button hole. I eventually settled on quick and simple. My sewing machine has some decorative stitches I never had found an opportunity to use. So I tacked down the middle of the pocket with a few snow- flake stitches. 

Snow flake stichesGaping reduced


That reduced the gaping quite a bit. I then hung the chaos reducer inside the cabinet using Command hooks and rearranged the items. Now everything fits and is more organized. 

Chaos reducer hanging in cabinet


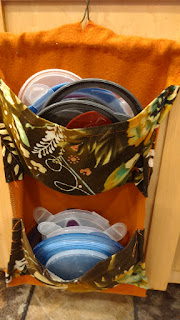
Here are a few more chaos reducers I have made that hang in the kitchen. 

Chaos reducer for coupons and cards
Chaos reducer for lids


Thursday, December 21, 2023

Low waste resolutions


Laundry strips, shampoo/conditioner bars, bag


If you want to make a New Year's resolution to reduce waste, but getting creative with the trash is not your cup of tea, here are a few ideas to generate less waste in 2024 that go beyond refusing straws and bringing your own bags to the store. These are all things my household has incorporated into our routines. 

1. Switch to solid shampoos and conditioners. There are a growing number of high-quality shampoo bars and conditioner bars available. These bars eliminate the large plastic bottles and reduce the need to transport water. I have thick but dry, hair that tangles easily. I use a moisturizing shampoo bar from  J. R. Liggetts and a moisturizing Hi-Bar conditioner.  While not cheap, the Hi-Bar conditioners are less expensive than the creamy conditioner I used to use. I purchase both locally because ordering from Amazon and all the accompanying packaging would defeat the purpose. 

2. Buy in bulk and bring your own containers. My local co-op Mississippi Market and the local zero waste store Tare Market allow customers to bring their own containers for dry goods. I regularly shop the bulk bins at both stores, weigh the containers before filling them, mark the tare weight and buy exactly the quantity I need. 

3. Turn old clothing into rags.  Reduce the need for paper towels by cutting up old clothing and towels into rags. Place them in the wash when you are done. Or if you use it for a heavy-duty job such as oiling a cast iron pan, simply throw it away. 

4. Bring your own containers to restaurants for leftovers. When we eat out, we bring our containers to the restaurants to bring home leftovers.  We also rinse out the thicker zip lock bags that granola or frozen fruit come in. I often tuck a bag that I have rolled up and secured with a twist tie in my purse so that I can use that as a takeout or bulk bag when I don't have a container. 

5. Use laundry strips and wool dryer balls. Like shampoo bars, laundry strips eliminate plastic bottles and water. As an added bonus, they take very little room to store. We use unscented Tru Earth strips.  In the warmer months, we often hang our laundry out to dry. In the colder months, we use wool dryer balls instead of fabric softener. Our dryer balls have lasted a decade. 

And for a bonus, please check out my blog post on normalizing reuse

Sunday, December 17, 2023

Denim ornament upcycle


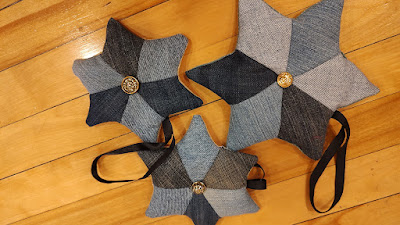
Three denim star ornaments

It's the holiday season. While my Jewish-Muslim family does not do a lot for Christmas, many of our friends celebrate. I had a few events to attend, a few gifts to give and a desire to be sustainable. My stash of scraps and materials to upcycle is also getting too big for the space that I have in my house.  Given all that, I decided to start crafting. 

While I seldom wear jeans because I can't find jeans that fit well (but someday maybe I will make a pair),  I have found that I  like to work with denim especially piecing together different colors. I found the directions to make quilted denim stars from Pillar Box Blue and thought I would make a few as Christmas gifts for a few of my friends who celebrate. 

The directions from Pillar Blox Blue were fantastic, so I won't repeat the step-by-step, but I will share my tweaks. 

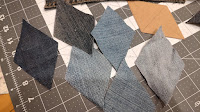
I made the first star using a 7cm template as described in the blog, but that turned out a little large for a Christmas ornament so I created a 6 cm template for the additional ornaments I made. The seams on the first one were a little messier than I wanted so I switched my sewing foot to a quilting foot and that helped me sew more precise about 1/4 inch seams. I also chain-stitched the diamonds for multiple starts didn't have to waste time or thread. 


 Denim diamondsSewing the denim star


I basted the ribbon I wanted to use as the hanger on the edge of the right side of the denim star before I sewed the denim to the backing. That way the ribbon emerged nicely from the seam once I turned the star right side out. I also used small pieces of fabric to stuff the stars. The opening from which I stuffed it was pretty small so I used a funnel and a chopstick to help push the scraps in.  While I did attach a button to the center, the ornaments looked good without additional quilting stitches so I skipped that as well.
I  was pretty amazed at how well the stars turned out. And I was able to wrap the stars with upcycled materials before gifting. 

Upcycled holidays


Gifts wrapped with upcyled materials


This year it appears that we have reached 1.5 C of warming above preindustrial levels.  This level of temperature increase is not sustained at this point, but things don't look great for Mothership Earth. I am freaked out. I am also human and therefore a social creature. I have been thinking about recent temperature anomalies and I was invited to two holiday/birthday social gatherings this weekend. It can be hard to reconcile my desire to consume less and participate as a member of society and the consumption that entails. 
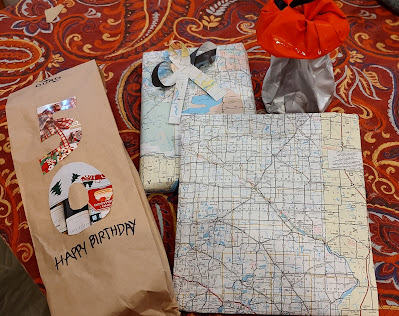
These two events involved gifting items to multiple people. So, as I often do, I decided to incorporate zero-waste principles. I did purchase a few new items such as a bottle of wine and books. But then I had fun getting creative with the garbage.  Instead of purchasing gift wrap that would be used once and then tossed or recycled, I chose to reuse other items. I wrapped a few gifts with an old map and even created bows with strips cut from it. 

The bottle of wine came in a bag so I cut a '5' and a '0' from a catalog that came in the mail and pasted them on to create a birthday theme. I also turned a coffee bag inside out to create a gift back for another item. I wasn't so thrilled with how simply turning it inside out looked so I cut the bag into a rectangle and transformed it into wrapping paper.  I cut a few narrow strips from the bag and ran scissors against it to create curly ribbon. 

I also made some upcycled gifts for these events, and you can read more about that in my companion blog post. 

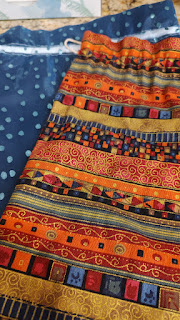
When we exchange gifts within the immediate family, we now use cloth bags that we then save for the next time. We have been using them for the past few years.  


Cloth gift bags


Low-waste celebration

I turned 52 a few weeks ago and I threw myself a low-waste birthday picnic at a local park. We have been hosting low-waste gatherings at hom...